
I taught myself how to needle felt by watching
loads of different YouTube videos.
I'm not fond of sewing~ this has been the
perfect way for me to make little characters from
the books I write and illustrate.
There are many approaches to needle felting...
I'll share mine~

These are the products I use.
I purchased mine from a gift shop that sells
wool/tools for rug hooking, products for punch needle,
wool roving (which I use for felting) yarns etc.
If ever you're in Canandaigua, NY
you should stop in at "Liberty Cottage."
Popular craft stores like JoAnn's and Hobby Lobby
now offer this same line.

Roving!
I like to purchase wool locally.
Amy Klee has the dearest farm!
Stone Edge Fibers phone 315/548-2032
I get MOUNDS of wool for the same cost
as a small tuft from the craft store chains.

It all starts with a tiny felting needle.
Please be very careful. They are sharp and HURT!
It's not a little pin prick... the needle has tiny barbs.
Some people felt on this blue foam.
I prefer the brush. I had this sample left from a class
I taught... it is more economical but the wool felts to it.

Begin.
Gather a tuft of natural wool and compress
it to the basic shape of your design.
Dyed wool is more costly...

...Begin felting by inserting the needle
over... and over... and over... etc.
Keep in mind the shape...

Now you have a basic shape.
(Zillions of needle jabs later...)
If you needle felt lightly~ your piece will be fluffy.
If you needle felt A LOT~ your piece will be solid.
The more needle work the tighter...
Personal preference...

Time to add color.
Take a very thin amount of dyed roving...
Notice in the photo how thin/see through my piece is?
It doesn't take much to cover.

Needle... needle... needle... etc.

Keep going...

Ta! Da!

Again... several different ways to add leaves.
I'll show you two.
First... four tufts of green roving.

The need for speed... (ha! ha!) Impatient Michelle...
This tool has five needles in it! The plastic guard
keeps you safe and protects the needles from breaking.
It stays extended until you apply pressure.
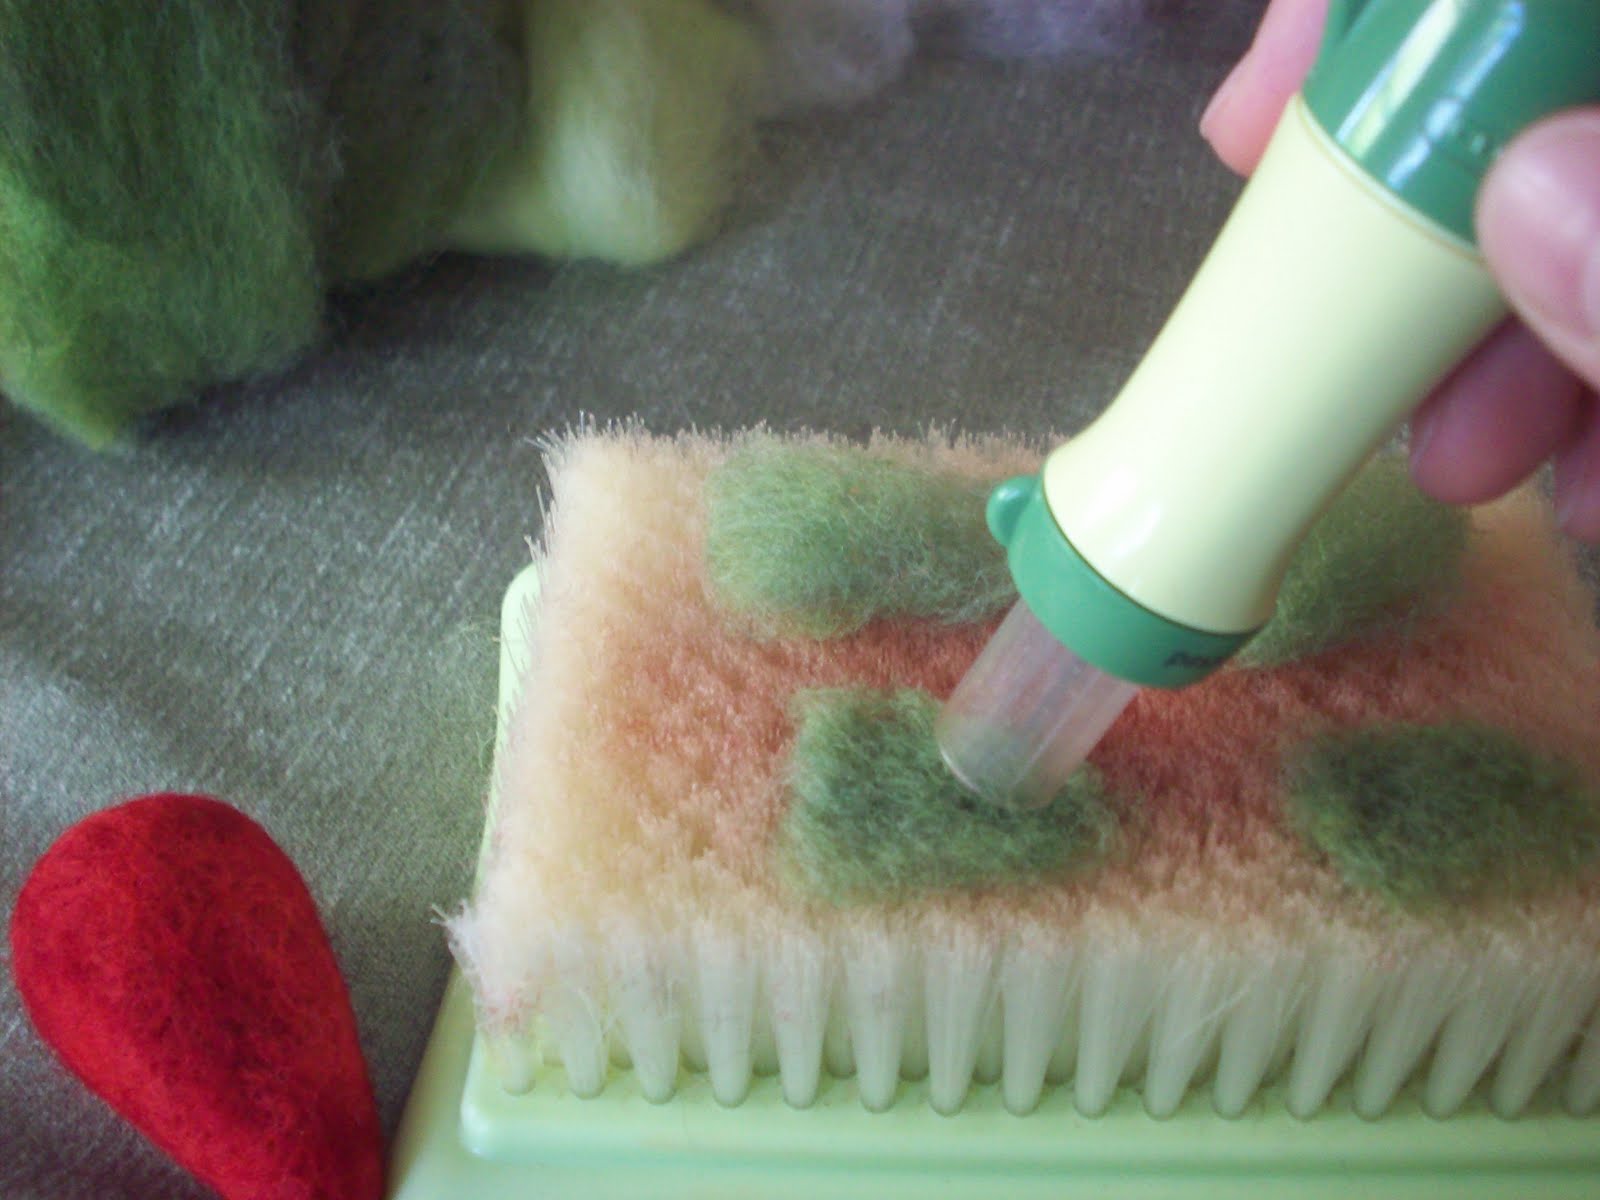
Felting the green roving into flat leaves.
Felt one side, pull it up, turn it over... felt the other side
until you have a compact tuft.

Shape with a single needle...
 Watch your fingers if you're not working
against the pad...
Add the leaves. They'll felt to the strawberry.
The barbs in the needle... it's magic! :)

So I only made four leaves the first way. I'm not a
symmetrical person. I design with odd numbers.
I left this space to show you another way to add leaves.
Gather a small tuft of green wool...

Start felting the shape of a leaf to the berry...

I think this way is a little easier.
Takes out a step or two...
Use the first process if you want
your leaves to be free-standing.
(click the bold area to see free standing leaves)
Strawberry leaves free standing...
(click the bold area to see free standing leaves #2)

They will look a little different...

I have my leaves on... I need to cover the top.

Needle... needle... needle...

Stem or loop... I'm making a loop.
To make the stem from the same roving...
A small tuft of wool, roll it in your fingers and needle
to the pad, continually turning, rolling etc.

I leave the ends a bit feathery so the fiber can
mix in and attach strong.

Needle... needle... needle...

I added a few little tufts in between the larger leaves.
You can add seed beads, yellow stitched X's etc.
The two links for the leaves show strawberries
I made that have seeds on them.

I hope I wrote this tutorial in a way that
will encourage you to try! It is very easy... fun...
Like all art~ each piece is different, unique and perfect!
I will try to answer questions as you begin...
The YouTube videos are helpful. Watching all of the
needle... needle... needle... work helps you understand
how long it takes to see results.
Hope your weekend is sunny and sweet!
35 comments:
Thank you so much, Michelle. What a fabulous tutorial! I've had the supplies to make a little dog for quite a while, but haven't tried it yet. Now, I'll have to get my stuff out and give it a go!
Have a great weekend, my friend.
xoxo
Donna
I love your tutorial,and the little strawberry-it so sweet.
I have tryed to needle feelt,too, but my temprament is not to that,--takes sooooo long time--I just wisch I could, when seeing your sweet strawberry.
xo Dorthe
Michelle, your strawberries are so sweet!!! I am crazy for strawberries in any form, and your tutorial has added another form that I adore and would love to try. Thank you for the inspiration and eye candy! ~ Angela
Oh my gosh! I have wanted to learn what felting was about for so long. How thoughtful of you to do a whole post to show us!
I imagine that little strawberry on a ribbon,as a bookmark for a little book of yours. :)
Hi Michelle,
Thank you so much for this post! I have heard of needle felting but never really knew what it was...this is simply awesome..your directions were very clear and your strawberries are wonderful!
:)
they look so sweet and real...and a great tutorial!
I made them too but with fabric, sewing with hand...
have a sunny weekend!
http://artfulldelight.blogspot.com/2010/04/openhuisdag-deel2.html
What a great little tutorial and your strawberries look good enough to eat!!
Amazing! xxx Fab to see it step by step xx
Michelle, you do these needle feltings so well! Like your sketches! The button idea is 'way cool! Such a nice touch to the little drawings!
Blessings,
Diane
I have never tried needle felting, because I didn't know how to do it ....this looks like Fun !!! I wanna make Neat strawberries !!! Thank you for the great instructions !!! My son's very first job was picking strawberries, so they have a special place in my heart....I LOVE your cute new designs, flowers with buttons !!! So Pretty !!!
Wow - those strawberries are works of art Michelle. Just beautiful!!!
XOXO
Jen
Great tutorial, Michelle! And I love your button art above it too.
Everything you make is so very sweet. I love your new pieces with lace. I hope you are having a good weekend.
Hugs,
Kathy
Thank you so much for showing us this. I have been very intrigued by felting, but had no idea where to even begin. Your strawberry is just so adorable. You made it look very doable.
Love it!
What a great tutorial! Thanks!
A grand morning to you Michelle... Thank you ever so kindly for visiting (and joining) my blog! I am delighted that you enjoyed your visit.
You do create such lovely, gentle goodies! I do fancy the strawberries and detailed instruction, but alas, I shall leave such grand creations in your hands.
I shall look forward to our next visit together...
Warmly,
Judy
Hello Michelle... I love all of these little strawberries! I also love the little felted critters on your sidebar, and am wondering if you take special orders? I did not see an email address for you on your blog, would you please email me at idyllhours@q.com? Your blog is lovely! Thanks... Julie Marie
Hello Michelle,
I was wondering how those were made ;))
Thanks for this inspiring tutorial. All your work is inspiring though! I have to catch up with your latest posts! Your fabric sketches look divine!
Monicax.
wonderful tutorial! thanks for teaching us!
Shannon
www.cascobaysoap.blogspot.com
Michelle, you started me doing this right from the start of your blogs showing us your darling little critters. I'm hooked......bad!
Thanks, Marcia
Good morning Michelle :) What a wonderful tutorial and such sweet and lovely strawberries :)
Wishing you a lovely day,
Doreen
Thanks so much for this tutorial. If you scroll the page quickly, you took such great step-by-step shots that it looks almost like a movie. Adorable little strawberry.
Hello Michelle, thankyou for visiting my blog. I see that you love all things antique too. I love your pretties of teddies and birds they ahve such character, and thankyou for the tutorialthis looks like a lot of fun. I will call in again.
Love Jillxx
Michelle~ ~ ~
I was here last week and saw Wilcox. What a sweetie he is. Thanks so much for sharing the needle felting. You know I bought a book over a year ago to give it a try but for some reason it scares me and I never did it.
I am a spinner and I have some wool fiber around here somewhere and since your encouragement I will try it.
Did you know that you can dye your own fiber with Kool Aid? Do a search for Kool Aid dying to find out how. It's pretty simple.
I like to use Dogpile.com for searching. They cover all the major search engines and proceeds go to help animals. Right down my ally.
~ ~Ahrisha~ ~
Thank you for sharing how to needle felt. I have never tried it before. After seeing your post I want to!
Michelle~Thank you! What a wonderful tutorial! Very clear instructions with great photos! Can't wait to try this! Your strawberries are very sweet too! Thanks again!~Kathy
That is so incredible, I hardly know where to start! Except to say that I know I could never do that. Nope, not even gonna try.
And you taught yourself. WOW.
Have a wonderful Tuesday!
Anne
Hello Michelle,
thank you for that tutorial..i love you frut.
greatings from the Nederlands send you Conny
Thank you for this wonderful tutorial, I had no idea how you did it.
It really looks like magic!
Your bluebird is sitting on my mantelpiece and now I love it even more:)
My daughter and I have been busy making needle felted mice. Mine, unfortunately seem to always look like rats! Love your sweet strawberries!
Kate
Dear Michelle,
I am a nubie to needle felting. I have ordered several books that say they are for beginners BUT they aren't, really. I wanted to learn to make simple shapes before I began to make my fantasy art. What I really wanted to make was a strawberry.
Thanks for your VERY CLEAR tutorial. Can't wait to get the wool colors to start the project. I have been studying strawberries all season and feel as though I know them. I have them "in my head". No to translate that into felt will be thrilling.
Thank you again. Birnie
Dear Michelle,
Thank you for your VERY CLEAR tutorial.
I have been wanting to get started on needle felting for some time now. I have ordered books, that say they are for "beginners", but, they are beyond my abilities. I wanted to start with simple forms. I wanted to start with a strawberry. Now I know how.
Thank you again. Birnie
It is good to see it all step by step and I hope that i can make one for myself now !
Love from the Netherlands ♥RINI♥
Спасибо, Michelle! Ваш мастер-класс просто замечательный! Я тоже благодаря Вам сделала свою клубничку из шерсти
Post a Comment