When I was in college I pinched every penny.
(Some things never change! ha!)
While working full time to pay for tuition,
I learned tricks that would save cash,
time and I loved when I could work off campus.
I was a commuter. Those mid-winter-late-night
treks back to the dark, cold campus studios
were dreadful!
COLORLESS BLENDER
A tutorial from last year when I made gift tags

Packaging tape was A LOT less cash than
clear acetate pages and black & white copies!
(A package of ten acetate pages was almost $20...
Some things do go down in price through the years)
For our fun today~
Black and white photocopy, package tape & water.
Place a piece of packaging tape over your image...


I placed it on this VERY old book.
The paper fibers are open and fragile...
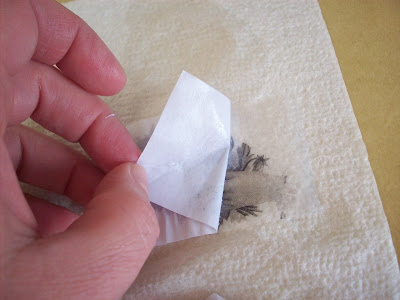
Pressing softly where the tape is still tacky...
Then gently lifting it off.
Pulls some of the type and paper
around the edges.

Use caution when setting these down where surfaces
are fragile, old... the tacky areas will stick and lift designs.
I use inexpensive packaging tapes because the
transfers are thin and light...
Better quality tapes are a bit thicker.
When using less expensive brands, try to let
the paper soak longer because the tape
is less durable & can tear easily.

I would love to see how you use this idea!
So many possibilities... so little time~
Hope your weekend is wonderful!


15 comments:
Very clever!
I am not sure that we have that kind of tape here?
Great Tutorial!!Warmest Regards,Cat
I can't wait to try this-thanks! Love, Debra
I can't wait to try this method!!!
I will definitely send you pics of my finished project.
Thanks for the tutorial!!!!
I absolutly love this project. I seen the dog and my wheels starting turning. Then you showed how to do this..I have alot of the clip art books..I would love to do my dog that passed away last year. But dont have any black&white photos... Thankyou so much for the tutorial...love it.Oh I need more time. Sally
Very cool! thank you for the tip.
I can't wait to try this! thanks for the great tutorial. Happy Valentines Day!
Thanks for this great tutorial,love it and going to try...
Kindly regards, Suzanne
just love your work!! and thank you for sharing this neat little project..will have to try it!thanks! will add you to my bloglist..
Wow, Michelle, this is COOL!
Diane
Thank you for sharing this. It looks doable with some practice. Now I have to show my ignorance on this - how do you get it onto something? Like the adorable dog in the book? Am I just not quite getting it?
Thanks!
Janelle
Janelle... it is a great question! Sometimes the tape is still sticky and it will adhere to certain surfaces on its own~ with a little burnishing. (or) It can be applied with the same clear glue dots, tapes etc. that is used in making scrapbooks with frosted/clear papers. I used a very thin line of rubber cement glue in college... some double sided tapes might work, too.
The puppy example in the post... I would maybe even copy. Then I wouldn't have to worry about glare from the shiny surface~
Do hope that helps :)
Thank you for all your comments!
Michelle, I received my prize today and it is Wonderful!!! Thank You!!! I love using packing tape for transfers, my kids say it's magic when I do this:) Thank you again for the BEEutiful artwork to hang in my home, Theresa
I absolutely love your watercolors, but this is a very interesting idea. I have never heard of it. I am going to expierment right now. Thank you!
Love your tutorial,
Thanks so much.'
Dorthe
Post a Comment